Class is one of keys to be familir with Object Oriented Programming (OOP). Multiple variables and functions are in the same class and they all are related to the “Object”. It’s easy for user to know what an object does by looking at the class member names comparing with functions alone. IDE supports intelisense that suggests possible variables/functions to call. This article is the perfect guide to learn how to use class.
Why class is necessary
We can define variables and functions without class in JavaScript/TypeScript world.
let count = 0;
function countup(){
    count++;
}
function displayCount(){
    console.log(count);
}
It’s ok for beginners to leave it as it is. However, you might think they all are related each other. If count is used in other place it doesn’t work as expected. It’s time to learn how to use class if you start thinking that you want to put them together and prevent from unexpected change. It’s possible to prevent from unexpected change without class if you write the logic separately for a caller and a callee. However, it doesn’t work as expected if there are multiple callers.
// Count.ts
let count = 0;
export function countup(){
    count++;
}
export function displayCount(){
    console.log(count);
}

// Caller1.ts
import { countup, displayCount } from "./count";

export function call1() {
    console.log("--- Caller1 ---");
    countup();
    countup();
    displayCount()
}

// Caller2.ts
import { countup, displayCount } from "./count";

export function call2() {
    console.log("--- Caller2 ---");
    countup();
    countup();
    displayCount()
}

// app.ts
call1();
// --- Caller1 ---
// 2
call2();
// --- Caller2 ---
// 4
We wanted to show 2 in call2 function but actually it’s 4 because they both call the same function that increments the same variable count . Let’s solve this problem by class.
Class variables and functions with property accessor
We can define a class in the following structure in TypeScript.
export class ClassNameHere {
    // class members
    constructor() {
        // initialization process
    }
}
const instance = new ClassNameHere(); // Create an instance to use the class
export enables us to use the class in different files. constructor function is already called when the new instance is created. We don’t have to write it if initialization process is unnecessary.
Member accessibility
There are some keywords to indicate the accessibility.
| accessor | meaning |
|---|---|
| public | can be used in the class and from outside |
| private | can be used in the class |
| protected | can be used in the class and in the extended class |
The default accessibility is public in TypeScript, so we can remove it if we want. I personally prefer put the keyword though. If readonly is specified its value can’t be updated.
export class BaseClass {
    public exposedProp = 1;
    public readonly readonlyProp = 99;

    protected proctedProp = "base-protected-prop";
    private privateCount = 0;

    constructor() {
        console.log("New BaseClass instance is created.");
    }
}

const instance = new BaseClass();
// New BaseClass instance is created.
console.log(instance.exposedProp);
// 1
instance.exposedProp = 22;
console.log(instance.exposedProp);
// 22
console.log(instance.readonlyProp);
// 99
static keyword to access without instance
If static is specified it can be used without creating instance. Be careful to use public static variable without readonly because its value can be updated in other place. If using public static variable it should be constant.
export class BaseClass {
    static staticProp = "static-prop";
    public static readonly readonlyStaticProp = "readonly-static-prop";
}
console.log(BaseClass.staticProp);
// static-prop
BaseClass.staticProp = "update-static-prop";
console.log(BaseClass.staticProp);
// update-static-prop
console.log(BaseClass.readonlyStaticProp);
// readonly-static-prop

BaseClass.readonlyStaticProp = "update-error"; // error
Defining functions
private function can be called in the class. If we create a function it can be big public function at first. We should extract the logic into a private function in this case to make the code readable. We can give a good name to the logic by extracting it into a function. Name tells us what the function does.
export class BaseClass {
    protected proctedProp = "base-protected-prop";
    private privateCount = 0;

    constructor() {
        console.log("New BaseClass instance is created.");
    }

    callPublicFunc(): void {
        console.log("Calling private function.");
        const result = this.callPrivateFunc();
        console.log(result);
    }

    private callPrivateFunc(): string {
        this.privateCount++;
        return `proctedProp: ${this.proctedProp}, privateCount: ${this.privateCount}`;
    }
}

const instance = new BaseClass();
instance.callPublicFunc();
// Calling private function.
// proctedProp: base-protected-prop, privateCount: 1
To call private function or private variable this needs to be used. this means the current instance of the class. The instance is created when calling the class with new keyword. Following example creates two instances and they are different instance. Each instance has each status. Therefore, privateCount of instance2.callPublicFunc() is 1.
const instance = new BaseClass();
// New BaseClass instance is created.
instance.callPublicFunc();
// Calling private function.
// proctedProp: base-protected-prop, privateCount: 1
instance.callPublicFunc();
// Calling private function.
// proctedProp: base-protected-prop, privateCount: 2

const instance2 = new BaseClass();
// New BaseClass instance is created.
instance2.callPublicFunc();
// Calling private function.
// proctedProp: base-protected-prop, privateCount: 1
Implements interfaces
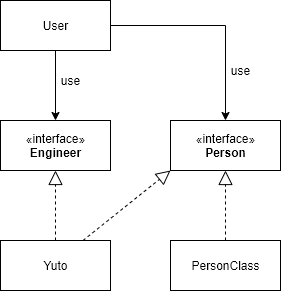
Interface is very powerful. The class with implements interfaceName has to implement the variables and functions defined in the interface. The caller can use the pre defined functions without knowing what the instance is.

Let’s create Person interface for example.
export interface Person {
    name: string;
    introduce(): void;
}
This interface has name variable and introduce function. This is just declarations but no concrete logic there. The function has to implement the concrete logic in the class. Compiler shows an error if it doesn’t have the defined members. It guarantees that the class with the interface definitely has the defined functions/variables.
export class PersonClass implements Person {
    public get name(): string {
        return this._name;
    }
    constructor(private _name: string) { }
    public introduce(): void {
        console.log(`Hello, I'm ${this._name}.`);
    }
}

const person = new PersonClass("Joe");
console.log(person.name);
// Joe
person.introduce();
// Hello, I'm Joe.
It doesn’t matter how we implement them as far as they are exposed. name variable is getter in the class but we can implement it as a public variable.
A class can implement multiple interfaces. If an interface has more than two roles it should be separated into two interfaces.
export interface Engineer {
    develop(): void;
}

export class Yuto implements Person, Engineer {
    public readonly name = "Yuto";
    public introduce(): void {
        console.log("Hello, I'm Yuto.");
    }
    public develop(): void {
        console.log("implementing...");
    }
}

const yuto = new Yuto();
console.log(yuto.name)
// Yuto
yuto.introduce();
// Hello, I'm Yuto.
yuto.develop();
// implementing...
Why is interface important
Let’s assume that we create an audio players that support mp3 and wav file. Since the format is different from each other we have to implement different logic. However, we want only one start/stop button. We need if-else conditional statement to switch those functions depending on the file format. It looks like following.
let player: Mp3Player | WavPlayer;
if (fileFormat === "mp3"){
    player = new Mp3Player();
} else if (fileFormat === "wav") {
    player = new WavPlayer();
}
if (player) {
    player.play(filename);
}
We can refactor it as following.
const player: Mp3Player | WavPlayer = getPlayer(fileFormat);
player?.play(filename);
It’s ok if the number of formats is 2 but it can be 10 or 50. When we add new class we need to add the class definition to the data type. In addition to that, the class may not have the function caused by typo. If using interface the class definitely has the defined functions and we don’t need to adapt the data type.
In static typing programming, it is traditional way to use interface so that we can replace the actual logic with mock object for testing.
Point
- can replace the actual object with mock object
- can constrain to implement the defined variables/functions
- we can implement our functionality without the actual component
These posts are also helpful to learn interface.

Extended class (Inheritance)
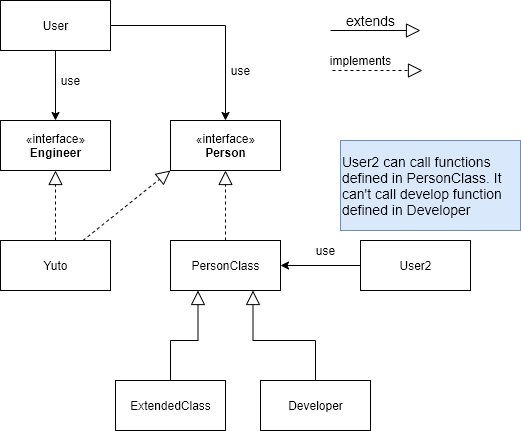
extends keyword is used when we want to create a class based on another class. For example, I defined PersonClass class above and want to create Developer class that has introduce function that contains the same behavior as the one in PersonClass. If we don’t extends a class for that we need to implement the same logic again.

Let’s see an example to extend a class.
export class ExtendedClass extends PersonClass { }
const martin = new ExtendedClass("Martin");
console.log(martin.name);
// Martin
martin.introduce();
// Hello, I'm Martin.
We don’t have to write new code if we just want to create a new class that is exactly the same as based class. It’s kind of alias for readability. ExtendedClass is the same as PersonClass.
If we want to change the existing functions’ behavior and add new functions we can write like this below.
export class Developer extends PersonClass {
    public introduce(): void {
        super.introduce();
        console.log("I'm software developer.");
    }
    public develop(): void {
        console.log("I found a bug... Let's ignore.");
    }
}
const anonymous = new Developer("anonymous");
console.log(anonymous.name);
// anonymous
anonymous.introduce();
// Hello, I'm anonymous.
// I'm software developer.
anonymous.develop();
// I found a bug... Let's ignore.
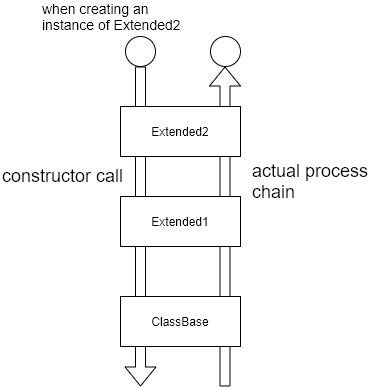
super in introduce function is a keyword to call property/function in base class. PersonClass.introduce is called in this case. After that call, it goes with its own process. By the way, when creating an instance of an extended class it calls constructor of base class. Then, the base class calls constructor of the base class. It’s hierarchal call.

Therefore, the base class can be used as base as literary. However, the functions that are newly added in the extended class can’t be called because it is not defined in the base class.
const downCasted: PersonClass = anonymous;
downCasted.introduce();
// Hello, I'm anonymous.
// I'm software developer.
downCasted.develop(); // error
Point
- can reuse existing code to extend it
- extended class can be handled with the same way as base class
Generics
Generics is used when we want to have exactly the same logic for different data type. T and K is often used for generics type. If there are multiple generics the name should be TKey and TValue for example.
export class PersonHolder<T extends Person> {
    private map = new Map<string, T>();

    constructor() { }
    public push(key: string, person: T): void {
        this.map.set(key, person);
    }
    public get(key: string): T | undefined {
        return this.map.get(key);
    }
}
The example above stores Person class or other classes that extends Person class.
const holder1 = new PersonHolder<Yuto>();
holder1.push("first", new Yuto());
holder1.push("second", new Yuto());
holder1.push("third", new Yuto());
const yuto = holder1.get("second");

holder1.push("error", new PersonClass("person1")); // error
// Argument of type 'PersonClass' is not assignable to parameter of type 'Yuto'.
// Types of property 'name' are incompatible.
//   Type 'string' is not assignable to type '"Yuto"'.ts(2345)
The PersonHolder class is used to store Yuto class. Therefore, compiler shows an error when other instance is specified. If we want to store another class we need to define like this below.
const holder2 = new PersonHolder<PersonClass>();
holder2.push("first", new PersonClass("person1"));
holder2.push("second", new PersonClass("person2"));
const person1 = holder1.get("first");

const holder3 = new PersonHolder<Developer>();
holder3.push("dev1", new Developer("Bob"));
holder3.push("dev2", new Developer("Alex"));
const alex = holder3.get("dev2");
We can store all classes based on Person class if we set the base class to the type T.
const holder4 = new PersonHolder<Person>();
holder4.push("first", new Yuto());
holder4.push("second", new PersonClass("person2"));
holder4.push("dev2", new Developer("Alex"));
You can learn more about Generics in the following post.

Abstract class
Abstract is base class for extended class. It means that it defines common variables and functions that are used in extended class. For example, the code looks like below if we need a common process but want to execute different function in the common process.
export abstract class ExecutorBase {
    constructor(protected _id: number) { }
    public execute(): void {
        console.log(`--- process start (ID: ${this.id}) ---`);
        this.run();
        console.log(`--- process end (ID: ${this.id}) ---`);
    }
    public get id(): number {
        return this._id;
    }
    protected abstract run(): void;
}
The function with keyword abstract has to be implemented in the extended class. We can also override other variables/functions if necessary. However, it should be replaceable with other extended class. The basic behavior shouldn’t change. If we need additional parameters for constructor we can add it but the constructor of base class must be called in it.
export class CommandExecutor extends ExecutorBase {
    constructor(id: number, private additional: string) {
        super(id);
    }
    protected run(): void {
        console.log(`***** Command executor (${this.additional}) *****`);
    }
}
const instance = new CommandExecutor(11, "hoooo");
instance.execute();
// --- process start (ID: 11) ---
// ***** Command executor (hoooo) *****
// --- process end (ID: 11) ---
console.log(`ID: ${instance.id}`);
// ID: 11
If we need additional function we can of course add it. putBug function is new here.
export class ProcessExecutor extends ExecutorBase {
    protected run(): void {
        console.log(`***** Process running... *****`);
    }
    public putBug(): void {
        console.log("Put a bug.");
    }
}
const instance2 = new ProcessExecutor(99);
instance2.execute();
// --- process start (ID: 99) ---
// ***** Process running... *****
// --- process end (ID: 99) ---
console.log(`ID: ${instance2.id}`);
// ID: 11
instance2.putBug();
// Put a bug.
However, when we want to use the class via abstract class it is not possible to call the added function.
const executors = new Map<number, ExecutorBase>();
executors.set(instance.id, instance);
executors.set(instance2.id, instance2);
const executor = executors.get(99);
executor?.execute();
// --- process start (ID: 99) ---
// ***** Process running... *****
// --- process end (ID: 99) ---
console.log(`ID: ${instance.id}`);
// ID: 11

executor.putBug(); // error
See the last line. putBug exists only in ProcessExecutor. It can actually execute it because its instance is ProcessExecutor but compiler throws an error since ExecutorBase doesn’t have the function.
What is the difference between abstract class and interface
Interface can have only declarations whereas abstract class can have logic in it. Interface should be used if abstract class doesn’t have any logic or concrete value is not assigned. The reason is that interface supports multiple inheritances but abstract class not.
// OK
class MultiInterfaces implements MyInterface1, MyInterface2 {}
// NG
class MultiAbstracts extends MyBase1, MyBase2 {}
When we want to add new feature to the class we add it to the interface or abstract class. If the funtion role suits to the interface/abstract it’s no problem. However, if it doesn’t suit to it we should split the definitions. We can split the definitions by interface but not by abstract class. Interface is more extensible.
Singleton
Singleton class is required when we want to manage something as a single source. It’s easy to create singleton class in JavaScript/TypeScript because it works on a single thread.
export class Singleton {
    private static instance?: Singleton;

    public static get getInstance(): Singleton {
        if (!this.instance) {
            this.instance = new Singleton();
        }
        return this.instance;
    }
    private constructor() { }

    private _count = 0;
    public get count(): number {
        this._count++;
        return this._count;
    }
}
A caller must get the instance by getInstance function because constructor is private. It means that the instance is created only once in the process life time. When we want to create singleton class constructor MUST be private. Otherwise, a caller can create as many instances as it wants.
console.log(Singleton.getInstance.count);
// 1
console.log(Singleton.getInstance.count);
// 2
However, since JavaScript is dynamic language we can hack the code.
console.log(Singleton.getInstance.count);
console.log(Singleton.getInstance.count);
(Singleton as any)._count = 0;
console.log(Singleton.getInstance.count);
// 3

(Singleton as any).instance = undefined;
console.log(Singleton.getInstance.count);
// 1
_count is member of the instance, so reassigning value on 3rd line doesn’t affect the result. On the other hand, instance is static variable and it is accessible if we cast it to any. This technique can be used when we want to write test for the class.
I think no one writes the code above in production code but you can improve this if you want to really prevent from the unexpected change.
export class Singleton2 {
    private static readonly instance: Singleton2 = new Singleton2();

    public static get getInstance(): Singleton2 {
        return this.instance;
    }
    private constructor() { }

    private _count = 0;
    public get count(): number {
        this._count++;
        return this._count;
    }
}
console.log(Singleton2.getInstance.count);
(Singleton2 as any).instance = undefined;
console.log(Singleton2.getInstance.count); // error
// TypeError: Cannot read property 'count' of undefined
As you can see, it returns error because new instance is not created in the getter. The instance is defined with readonly but it’s actually updatable. This second implementation creates new instance as soon as it’s module is loaded. Therefore we shouldn’t write this way if it takes long time to initialize it.
You can learn how to write test for singleton test in this post.
End
This post covers most useful features that class supports. It’s important to split classes according to its role for readability and maintanability. If each class is small enough we can quickly understand what the class does. The techniques shown above are helpful splitting a class without code duplications.


Comments